Playing kMoria
screenshots are from v. 0.13 - preferences screen has changed in 0.14
screenshots are from v. 0.13 - preferences screen has changed in 0.14
Hopefully you're familiar with rogue-like games already. They are text-based games which have a familiar premise --- wander around in a dungeon, collect treasure, beat up bad-tempered critters, try to finish a quest.
Your goal in this game is to defeat the Balrog, who lives deep in the mines of Moria.When you start the application you will first have to generate a character. (Follow that link to see out how it's done.)
Then you will start out in the town. If you are not familiar with Moria or want a refresher, first read the very brief intro to what you see on the main screen. When you've looked over that, come back here and I'll tell you how to move around and do things.
| How to move | Options Menu | Commands Menu | More Menu | Inventory | Preferences | Hardware buttons |
(If you have played iRogue or iLarn, you can skip this section, since movement in kMoria is similar.)
First, imagine that the screen is a compass. At the top of the screen is north. Imagine that this compass is divided like a pie into eight slices: N, NE, E, SE, S, SW, W, NW. The slices meet in the center of the screen. Tap within a slice, and that is the direction you will move in. (If you have the "relative move" preference enabled, the center of the pie is at your "@"; otherwise the pie is centered on the screen regardless of where the "@" is located. The rest of these instructions will assume the latter.)
![[pie-sliced screen]](../images/kMoria/pie.gif)
Ok. You got the pie? I am going to complicate it now. If you tap too close to the center of the screen, nothing will happen. Moving outward... If you tap moderately close to the center of the screen, you will move one square at a time. If you tap far from the center of the screen (near the edge of the screen), you will move several squares -- you keep moving until you are adjacent to something "interesting".
![[concentric-sliced screen]](../images/kMoria/circles-pie.gif)
So there's a pie of what-direction-you-move, and there are some concentric circles of what-happens-when-you-tap. You can adjust the size of these circles via the Preferences menu item, depending on what you think is deserving of more screen real-estate.
Oh, yeah: to attack a monster "hand-to-hand", with whatever weapon you're currently wielding, you just try to move onto its square. If it is immediately to your west, tap on the west side of the screen, etc., and you should see a message such as "You hit the Large White Snake. MORE" (if it does say MORE, tap once anywhere to see the next set of messages).
If you don't want to attack hand-to-hand; you can stand at a greater distance and cast spells, throw/shoot missile weapons, and aim magic wands.
Keyboard users: type hjklyubn to move around, HJKLYUBN to run. (You can also use cursor keys, if you don't mind moving like a rook instead of a queen.)
| How to move | Options Menu | Commands Menu | More Menu | Inventory | Preferences | Hardware buttons |
The Show menu has commands that show you information. None of these commands will take up a turn in the game.
Some menu items have a character in parentheses. These commands can performed by writing that Graffiti character (in addition to using the menu).
![[Show menu]](../images/kMoria/menu-show.gif)
go to the Show menu
| How to move | Options Menu | Commands Menu | More Menu | Inventory | Preferences | Hardware buttons |
The Pick menu has all the commands that present a list of things for you to pick & choose.
![[Pick menu]](../images/kMoria/menu-pick.gif)
go to the Pick menu
| How to move | Options Menu | Commands Menu | More Menu | Inventory | Preferences | Hardware buttons |
The theme of the Here menu commands is things that you do right where you are, not in a particular direction (as opposed to the Near menu of directional commands).
![[Here menu]](../images/kMoria/menu-here.gif)
go to the Here menu
Certain commands can be repeated n times. (rest, search, open, force, spike, dig, disarm.) To do this, write a number (1 to 99). Then write the letter of the command. You will perform the command that many times unless the situation changes (e.g. if a monster attacks you, you stop).
In addition, if you want to do a command "again", there is a special unlisted command "g" that will repeat whatever you just did: for example, "cast a magic missile to the northwest" or "throw/fire an arrow to the south" or "force the door to the east".
These commands all require you to choose a particular square near (adjacent to) you. When you issue the command, you will be given pie-lines to indicate that you should tap in a slice to choose a direction.
![[Near menu]](../images/kMoria/menu-near.gif)
go to the Near menu
These commands don't take a turn. They let you set various options.
![[Set menu]](../images/kMoria/menu-set2.gif)
go to the Set menu
There are menu options in a couple of other screens in this game.
In your inventory screen, there is an option "Un/Compact". This will switch between giving each item a single line (and probably truncating its description), or giving each item enough lines to show its full description (well, to a maximum of two lines, but that should really be enough). There is also an option to show weights. If you have a character who is not very strong, and you reach the limit of what you can carry, this might be useful to help decide what to discard.
In the store screen, there is a similar Un/Compact option that will switch between giving each item one line or two lines (regardless of description length). There is also an Un/Haggle option. This option turns off Haggling. If you don't mind suffering a mark-up in return for not having to bargain with the shopkeeper, try this option. (If you like to get the best possible price for an item, or find the comments amusing, you can ignore this option.)
| How to move | Options Menu | Commands Menu | More Menu | Inventory | Preferences | Hardware buttons |
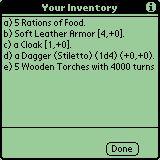
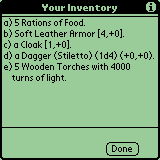
write i to see your inventory
Adventurers tend to collect things. Where do they go? Your pack. How do you do something with them once they are there?
To do something to an item in your inventory, select "Inventory"
from the Commands menu (or write "i", lower-case I.)
A window will pop up with a list of your inventory. Select any item,
either by tapping, or by writing its index letter (b in the
example shown below). This should cause some buttons to appear,
labeled with relevant actions. Tap the button of your choice to
perform that action.


we select b and then tap wear
Note that performing these actions takes time, and you can't see what's going on out there because you have your head in your pack or something.
You can switch from the Inventory to the Equipment screen by tapping on the "[E]" in the lower right corner; this doesn't take any time.

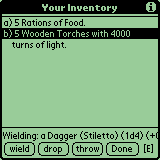

keep tapping wear/wield until everything is equipped!
finally, tap [E]...
When you are finished, tap Done.
Keyboard users: type an index letter, e.g. b to select
the second item. Hit return (or type 1 for the first button)
to wear/wield it. You can type 2 for the "drop" button,
3 for the "throw" button, 9 for the "Done" button,
and 0 for the [E] Equipment button.
The Equipment screen is similar. Index letter to select,
1 to take off, 2 to drop, 9 for done, 0 for inventory.
It is said: "Do not go into the dungeon naked or the monsters will laugh at you."
To do something to an item in your Equipment, select "Equipment" from the Commands menu, or write "e". (Or, if you are in Inventory, tap the [E] button.) A window will pop up with a list of your equipped inventory. Select any item. This should cause some buttons to appear, labeled with relevant actions. Tap the button of your choice to perform that action.


select an item to see that it can be taken off or dropped.. tap Done
Note that these actions take time. Remember the "exchange" command to save a turn when swapping weapons.


here we try writing x to exchange weapons.. then write e to see equipment
we had a primary and no spare... now we have a spare and no primary,
we could wield a new primary weapon
You can switch from the Equipment to the Inventory screen by tapping on the "[In]" in the lower right corner.
When you are finished, tap Done.
| How to move | Options Menu | Commands Menu | More Menu | Inventory | Preferences | Hardware buttons |
As I mentioned above, there is a Preferences item on the Options menu which will allow you to set various things, including the size of those "what am I doing when I tap somewhere" circles.
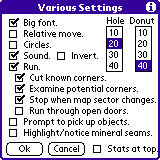
The preferences screen also allows you to:
![[concentric-circles screen]](../images/kMoria/circles.gif)
Not offered: "centered" scrolling to keep the rogue in the center of the screen. If you have played Unix Moria, you know that even there the dungeon levels are divided into panels (to fit in your xterm) and you move about within the panels. Playing on your handheld is just the same (except that the panels are smaller) so call this "an authentic experience" and call me "lazy"
| How to move | Options Menu | Commands Menu | More Menu | Inventory | Preferences | Hardware buttons |
![[buttons]](../images/kMoria/hwb0.gif)
You have the option of rebinding the four application buttons, the up/down scroll buttons, and the silkscreened calculator and find buttons. You can rebind some, all, or none. Once you have made some choices, check the "use these settings" box to turn it on. (If you ever want to turn the rebinding off temporarily, all you have to do is uncheck the box. kMoria will remember your settings but won't use them.)
You have a fixed set of choices for each button. (The dashed choice you see at the top is "don't rebind this button", i.e. let the button do whatever it ordinarily would.)
To bind a button: First, select that button (on the left).
Then, select something from the list (on the right). Let's select "Addr" and then select "west".
![[buttons]](../images/kMoria/hwb1.gif)
![[buttons]](../images/kMoria/hwb4.gif)
![[buttons]](../images/kMoria/hwb5.gif)
As you can see, "west" appears next to the button that we bound it
to. Thrilled with this accomplishment, we go on to bind the other
directions, and show off a couple of the other bindable commands... (see
second picture in that row).
In the third picture in that row, we see how to unbind a button:
If you want to unbind a button, select it, and then select
"---". We had bound Memo to font, now we unbind it, and so now if we
hit Memo during the game we would just go to the MemoPad application.
Ok, suppose that you have some hardware buttons bound to some commands, but you really want to be able to fire off a spell as a three-button sequence (like you can in regular desktop Moria). Hit Menu in the dungeon, then hit Set, then select Spell Btns and you will be in this exciting new screen.
![[spell btns]](../images/kMoria/spellbtns.gif)
![[spell btns]](../images/kMoria/spellbtns2.gif)
![[spell btns]](../images/kMoria/spellbtns3.gif)
When you are casting spells: The books are already bound to the four application buttons. How about the spells/prayers in each book? You get to choose how to bind each particular spell (or whether to bind it at all).
First, select the button that you wish to bind. Here we select Memo. Then, select the spell that you want to bind to that button. Here we select Magic Missile. Then you will see "a" (the index letter of the spell we selected) appear next to Memo, just as you see in the second picture. (To unbind the button, select the button, and then tap on -None-.) Suppose we have bound "Todo" to "magic" in the Hardware buttons screen: then to cast a magic missile with button presses, we would hit "Todo" (then the screen of books comes up) then hit "Datebook" (to select the first book) then hit "Memo" (which is the step that we just defined here).
(If I lost you on "hit 'Datebook'" I will reiterate: the four app buttons are bound to spellbooks, in the books screen. Datebook will select the first book, Address will select the second, Todo will select the third, Memo will select the fourth. If you have four.)
What about spells from the other books? In the lower right corner there is a list of the 8 books. (You can get to this screen no matter what character class you are playing, and you can bind any spells in any books, so if you know what the spells do and which ones you find most useful, go ahead and bind them once and for all.) We started out on the first Mage book. To get to the next Mage book, tap on the list in the lower right corner, and select the next item in the popup list. This changes the spell list - and we see the third picture. We can bind these spells as desired, and then go on to the next book...
Need help with gameplaying strategy?
You feel yourself speed up.
You could consult the experts on the Moria newsgroup.

